Tech Tips

Microsoft Windows, Tech Tips, Windows 10, Windows Technical Preview

Dual-boot Windows Technical Preview (aka Windows 10) on a UEFI-Enable Computer

I’m really excited about the Windows Technical Preview (aka Windows 10) that was released today. I decided to forgo a virtual machine and dual-boot it on my laptop running Windows 8.1. My laptop is an Asus G55VW and the existing Windows 8.1 installation being setup in UEFI (with the requisite GPT partition scheme).

I downloaded the image and made a flash drive using the Windows 7 USB Download Tool, but when I booted from the drive and tried to install, I got an error message: “Windows cannot be installed to this disk. The selected disk is not of the GPT partition style” when I clicked on the empty partition I wanted to install to.

I realized the flash drive was booting the MBR installer, but I needed UEFI. I realized I needed a USB flash drive setup to boot the Windows Technical Preview installer in UEFI mode. Here’s what I had to do to create the bootable flash drive that does just that:

  1. Plug a flash drive into a USB port on your machine.
  2. Download the Windows Technical Preview 64 bit ISO at http://preview.windows.com (you’ll have to join the free Windows Insider program and click through a few screens to get to the download link)
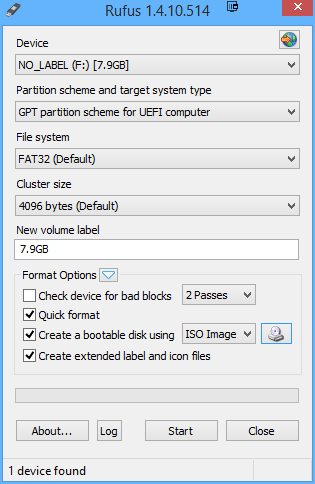
  3. Download Rufus. Rufus is a small utility that will put the ISO files on a flash drive you can use to boot from and install Windows. While there are other utilities that do this, Rufus allows you to specifically setup the flash drive as a GPT boot device. This will allow you to install Windows Technical Preview on a GPT drive, side-by-side with Windows 7/8/8.1.
  4. Launch Rufus.
    1. Set the Device dropdown to the flash drive you want to turn into a technical preview installer.
    2. Set the Partition scheme and target system type dropdown to GPT partition scheme for UEFI computer.
    3. Click the little disc icon next to the ISO image drop down and point to the Technical Preview ISO you downloaded in step 1.
    4. Click Start and wait until the status says DONE.
Setup Rufus as shown
Setup Rufus as shown, using the Windows Technical Preview ISO as the source image

You should now be able to boot from the USB drive and install the 64 bit Technical Preview in dual boot on most machines that boot using UEFI and have a hard disk with GPT. I’ll leave it to you to find out how to create a empty partition to use for the installation, but at least now you will have a UEFI flash drive installer.

Microsoft Windows, Tech Tips

Get Rid of Text Formatting (in Almost Any Program)

Have you ever copied some text from a webpage (or any formatted program, for that matter) and pasted it into another program only to find that all the fancy formatting simply doesn’t look right in its new location? If I had a nickel for every time that copy and paste between program hasn’t played nice, I’d be a wealthy man…Anyway, I’ve always relied on a trick that most people don’t think about when I want just text and nothing else:

  1. Copy your text from your source (no matter how heavily formatted it may be)
  2. Open Notepad
  3. Paste the text into Notepad
  4. Highlight and copy the text from Notepad
  5. Paste your (unformatted text) into the destination program.

This tip isn’t rocket science, but a lot of people have never thought if it.

Tech Tips

Google Search Tricks

Google is, in my opinion, the search engine that all other search engines aspire to be. You throw in almost any half-way coherent word or phrase and Google will try its best to show you everything it thinks relates to that phrase.

The cool thing is that there are many ways to help Google find exactly what you want. Usually, it’s just a matter of using a few symbols or prefix words to get more of what you want. Check out the examples below:

Search a Specific Site for Some Words or a Phrase

To search a specific site, use:

site:wired.com wearable computer

In this example, we are searching the website wired.com for the terms wearable computer. Just put the URL of a site you want to search after site: and you’re good to go.  (Make sure not to put a space between the colon and the URL or it won’t work.)

Search for Synonyms of a Word

Putting the ~ character (called a tilde or colloquially a squiggly) before a word causes Google to search for that word and its synonyms. For example, searching for

~colleges in canada

brings up sites that are about colleges, schools, universities, and education in Canada. All those words are synonyms (or have ties to the meaning) of college.

Use Double Quote to Search for Exact Phrases

If you know you’re looking for an exact phrase, you can include the phrase in double quotes, like:

“green turtle”

If you’re searching for a common phrase, most of the time, this won’t alter your results much because Google usually tries to go with exact phrases when it can, however, it can sometimes help you get more specific. (By the way, if you do a Google search for “green turtle” with and without quotes, the results are a little different.)

Exclude Sites that Contain Certain Words

It’s possible to exclude sites that have certain words in the results. Simply put a minus sign (-) in front of any word you want to make sure DOES NOT appear in the resulting pages. (This next example is liable to get me hurt but…) For example, if I wanted to search for wildcats but didn’t want any pages that mention Kentucky in them, I could type:

wildcats -Kentucky

(If you do search for wildcats without excluding Kentucky, Kentucky Wildcats is the fifth listing. If you do it with -Kentucky, you get much different listings.)

Search for Specific Filetypes

If you know the type of file you are looking for, you can use filetype: followed by the extention you are looking for. For example,

filetype:jpg woodrow wilson

would find only jpg files with the words woodrow wilson in the filename. (Note: This usually doesn’t work with the extensions: mp3, avi, mov, or mp4 because Google got in hot water back in the day for making it so easy to search for pirated media files.)

Look for Definitions of a Word or Phrase

To look for definitions, type define: and the word or phrase you are interested in. So, a search for

define:onychophagia

would give you that definition. (Note that the definitions returned are usually correct, however, I have seen cases where the definition may be wrong. You must use your own judgement on this. [but the definition given for my example is correct :) ])

Find Something by a Specific Author

Use author: to find something by a specific author. So

systems success author:mclean

would find articles on systems success authored by anyone with the name of McLean. (Note this isn’t 100% foolproof, but if you know an author you are looking for, it doesn’t hurt to try it.) An excellent source for searching for academic articles is Google Scholar. This has helped me with many papers over the years.

There are many more Google tricks (and I’m sure many that I don’t know about), but the ones listed above are the ones I use almost on a daily basis. Google google tricks and you’ll find many articles on the subject.

Apple, Tech Tips

What to do if the iOS Message App is Stuck Upside Down

Recently, I ran into an issue with the iOS Message app being stuck upside down on an iPad. By that,  I mean it would not rotate to the right orientation and was facing 180 from the power button. The first thing I checked was the rotational lock, but that wasn’t enabled (and, besides, all other apps were rotated correctly). My next thought was to close and reopen the app, in hopes that restarting it would fix it. Luckily, that worked. Here’s how to close and restart an app:

  1. Tap the Home button one time (to get back to the Home Screen)
  2. After you’re on the Home Screen, wait a couple seconds, the double-tap the Home button. (This will bring up the multi-tasking bar at the bottom of the screen)
  3. Tap and hold on the Message app icon (or any icon, for that matter) in the multi-tasking bar until the icons start to jiggle. The jiggling icons should also have a red circle with a white minus sign (-) in the corner.
  4. Tap the red circle with the white minus sign in the corner of the Message app.
  5. Tap the Home button to close the multi-tasking ba.
  6. Open the Message app back up.

Hopefully, the Message app will now be rotated right-side up, as it should be!

Gadgets, Raspberry Pi, RaspBMC, Tech Tips

RaspBMC is Awesome Once You Get It Running

Last night, I finally got RaspBMC running on a 512MB Raspberry Pi, complete with Wifi capability! The setup is serving up episodes of Big Bang Theory ripped from my DVD collection (with more rips coming as soon as I get around to it). I love the Raspberry Pi Project. Furthermore, RaspBMC is definitely a killer app for the Pi and I’m so grateful it’s being developed.

That being said, I had to do a lot of searching and trial and error to get it all to work the way I wanted. Below are some things I had to do to get it all running the way I wanted.

  • I had to forego my really fast SanDisk 8GB Extreme SDHC Class 10 SD Card for a much slower Class 4 card. Two different Class 10 cards would go corrupt after a few reboots, resulting in the error “Kernel panic – not syncing: VFS: Unable to mount root fs on unknown block(179,3)”  Switching to the much slower Class 4 card has  eliminated the error (as of about 15 reboots).
  • I couldn’t use the fancy installer. Everytime I did, the Pi would get stuck in a loop reboot loop complaining about a failed update. I ended up using the pre-built RC5 image: The last resort ended up being the only one where I could get really far into installation.
  • The super-tiny Edimax EW-7811Un 150 Mbps Wireless 11n Nano Size USB Adapter works incredibly well without having to install any drivers (at least with the RC5 pre-built image). I have never bought such a cheap piece of hardware that ended up being so awesome. Note that to setup your wifi connection from within the GUI (which is what I did), you’ll need to install the Network-Manager addon from the XBMC addon repository.
  • The official XBMC Android Remote DOES NOT work with RaspBMC RC5. It’s a known issue. Apparently, there was a change in the remote communication API that has rendered the remote broken for XBMC 12. The Yatse remote app works great and allows me to pick what’s playing from my phone screen instead of having to squint at the TV.
  • I disabled automatic updates (even though it’s strongly encouraged not to do so) because it doesn’t seem to play nice with my Hughesnet.

I encourage anyone who is struggling to get RaspBMC up and running to NOT GIVE UP. It’s awesome once you get it working. And eventually, I’m confident that the RaspBMC devs are going to release an out-of-this-world distro that just works out of the box. Until then, I’m more than willing to work around these little issues and keep cheering them on!

Microsoft Windows, Tech Tips, Windows 8

Right click in the bottom left corner of Windows 8 for some awesome options

I really like Windows 8.  I’ve upgraded my desktop and my netbook (which I’m typing this post on) and it has made both machines run faster than Windows 7.  Windows 8’s designers thought of all sorts of little things that I absolutely love.

My favorite is right-clicking in the bottom left corner of the screen (no matter what mode you are in). You’ll be greeted with an awesome menu with a bunch of Power User favorites.

Right-click the bottom left corner of a Windows 8 screen to get this sweet menu with loads of Power User favorites.

The menu includes the following shortcuts (with my favorites in bold):

  • Programs and Features
  • Mobility Center
  • Power Options
  • Event Viewer
  • System
  • Device Manager
  • Disk Management
  • Computer Management
  • Command Prompt
  • Command Prompt (Admin)
  • Task Manager
  • Control Panel
  • File Explorer
  • Search
  • Run
  • Desktop

This list is a who’s who of stuff that Power Users, system admins, and lab managers use every single day in one quick-to-access place. If you are one of these people, make sure to add this to your mental toolbox. Happy admin’ing!

Microsoft Windows, Tech Tips, Windows 8

Creating a System Image in Windows 8 Without Using Third-Party Tools

I took the plunge about three weeks ago and upgraded from Windows 7 Home Premium to Windows 8 Pro. (I took advantage of the fantastic $39.99 upgrade deal, which is good until January 31, 2013.) I’m not going to do a full review, but suffice it to say I think Windows 8 is great. It has a learning curve and the Start Screen freaks a lot of people out, but I promise, there’s more to like than dislike once you get used to it. It is definitely faster than Windows 7 and I think it was a step in the right direction.

As always with any major OS upgrade, some stuff gets moved around or changed. I’ve had very little trouble getting used to things, but then I asked myself, “How can I create a System Image in Windows 8 that will allow me to restore EVERYTHING in the event of a hard disk crash?” This should be simple. It was very easy in Windows 7. Why on earth would they ditch it in Windows 8? I found a post about the new Windows 8 File Recovery feature, which looked like a brain-dead version of Windows 7’s backup. Thankfully, though, the Windows 7 Backup tool is included with Windows 8: It’s just hiding. Here’s how to find it:

  1. Hit Windows Key+Q to open the Search Charm
  2. Type “Windows 7” in the Search box (without the quotes)
  3. Click “Settings” below the search box.
  4. Now, on the right-hand side of the screen, you should see Windows 7 File Recovery.


Hit Windows Key+Q, type “Windows 7”, click Settings, the click on Windows 7 File Recovery to create a System Image in Windows 8.

From that point, you’ll be able to backup your Library files and create a System Image, exactly like you did in Windows 7. If you’re like me, this probably makes you very happy because I usually prefer to use stuff included in my OS to perform backups. (It’s not that there is anything wrong with third-party tools, but built–in means one less thing I have to hunt down and configure :)

[Very Important: You should NOT put backups from Windows 7 and Windows 8 from the same computer on the same backup drive. The Windows 7 File Recovery tool warns against this, and from what I know about backup sets, this would basically create a very inconsistent state since you would have many (very incompatible) versions of the same files all intermingled. It could make a System Restore a very scary proposition. I’m lucky enough to have plenty of USB hard drives lying around, so I left my Windows 7 System Images on the old backup drive and put the Windows 8 Images on another.]

Cell Phone Tricks, Tech Tips

Sending a Text Message to an Appalachian Wireless Customer Through Email

I just learned the coolest thing: You can send text messages to Appalachian Wireless customers using plain ol’ email. The email address to send the text to is:

<tenDigitPhoneNumber>@awsms.com

So, for example, if your Appalachian Wireless phone number was 606-272-5555, your texting email address would be:

6062725555@awsms.com

I’m sure this is common knowledge to most people, but I didn’t know you could do that. I’d be willing to bet that every other carrier has a similar mechanism, as long as you know what the domain part of the address would be.

Adobe, Illustrator, Tech Tips

Use Points as Your Measurement When You Create Web Slices from Guides in Illustrator CS 5

Today, I found 150 really awesome free vector icons that were in AI format. The problem was, they were in one file on the same layer! The icons were laid out in a row and column pattern, but I had to create guides manually. Once I created the guides, I proceeded to use the handy Object > Slice > Create from Guides feature to chop each icon into it’s own file. After a very long time processing, and much to my dismay, the slices generated were not cut neatly along the guides! There were a bunch of erroneous slices that corresponded in no way to my nice little guide array. It turns out some other people have had this problem and from the several things I read and was able to piece together, there’s a workaround (or at least a series of things I did that lead to a working solution).

  1. I set my ruler units to Points.
  2. I made sure View > Snap to Point was checked.
  3. Then I turned on the Grid (Ctrl + Double Quote) and dragged out my guides so they snapped to the grid.
  4. I grabbed the Select Slices tool and pressed Ctrl + A to select all my slices.
  5. Following that, I ran  the Object > Slices > Create from Guides command again.
  6. This time, in about 10 seconds, I was presented with a beautifully sliced AI file with 150 pristinely cut slices.
  7. From that point, I ran my Save for Web and Devices with Images Only like I have a million times in the past and ended up with a folder full of glorious png icons.

From what I can gather, this issue is common if you use a metric other that Points. Illustrator displays at 72 points per inch (ppi), which must mean their is a bug in some unit transformation somewhere in the program. Let’s hope Adobe gets that fixed so that creating slices from guides becomes a unit agnostic operation.

Excel, Microsoft Office, Tech Tips

Fix for Excel 2007 Not Printing Embedded Chart Titles

The other day, I was trying to print some Excel 2007 worksheets that had my data at the top of the sheet followed by charts made from the data below. The charts had titles included, which showed up fine in Preview, however, when I actually printed, the titles were missing! Very strange indeed!

After some digging around, it seems that Office 2007 Update KB2596596 is the cause of the problem. At first, the only solution I was able to find said to uninstall this update and that would fix the Excel printing problem, but I wasn’t satisfied with that.

After some further digging, I found out that Microsoft has released a Hotfix that fixes the problem. (In Microsoft parlance, a Hotfix is a patch that will fix an issue that hasn’t undergone a full suite of testing.) KB2597962 can be requested from Microsoft (i.e. they’ll send you a download link in email, since it’s an unsupported file) by going to the KB2597962 article and clicking on View and Request Hotfix Downloads. Fill out the form and acknowledge the fact that the Hotfix hasn’t been fully tested, and you’ll have a shiny download link in your inbox in no time.

For what it’s worth, I installed the Hotfix on five machines and it has caused me no trouble at all.

Scroll to Top