After doing some testing using a Lenovo T14 with a 12th Gen p-core and e-core CPU, Windows 11 is still slower than Windows 10 with a few minuscule exceptions even after the 22H2 update.
TLDR Version: Download the program below to make it easy to save Windows 10 Lockscreen Images. Extract the file and run the .exe with the blue icon. Double-click on any lockscreen wallpaper you wish to save. Point to the folder where you want to save it and give it a filename. Click “Save.” Enjoy your saved lockscreen wallpapers!
Please Note: I have tested this program on my own computer and it seems to work well. I don’t expect it will cause you any problems. HOWEVER, I am not responsible for any damage it may cause! Use this program at your own risk.
Detailed Description: If you have a Windows 10 computer, you may notice that Microsoft puts some absolutely beautiful pictures on your lockscreen (the thing you see before you get logged into your machine). Unfortunately, Microsoft doesn’t make it very easy to save these images so you can use them later on your desktop, put them back on the lock screen, or whatever else you want to do with them.
I sat down this evening and wrote a little program in C# that lets you see all the lockscreen images that have been downloaded to your computer. If you see one you want to keep, you simply double click on its thumbnail and you get the option to save it wherever you like. The files come from Microsoft as a jpg, so my program saves them that way as well.
You can download this zip fileand extract it. Run the .exe in the resulting folder (it’s the file with the little blue icon) and you’ll see all the images in the folder that contains the downloaded lockscreen wallpapers.
Please Note: I have tested this program on my own computer and it seems to work well. I don’t expect it will cause you any problems. HOWEVER, I am not responsible for any damage it may cause! Use this program at your own risk.
A couple days ago, I needed to record a short tutorial video for a client. I wasn’t able to get to my normal workstation where I normally do my recordings, so I decided to do it using my laptop running Windows 10 1909 and my Zoom H5 recorder with a Sennheiser ME-2 II lavalier mic plugged into it.
I plugged into a USB 3 port and chose the Audio Interface option. Then I installed the AISO stereo driver and rebooted the computer. I made my recording the PCs desktop using OBS where I had set the H5 up as an audio source. When I played back the recording, I sounded like a robot, or better yet, one of those people on a show about gangs who doesn’t want to be identified and they have their voice distorted where it’s really low pitched and garbled.
Just to verify it wasn’t an OBS issue, I tried a recording in the Windows 10 Voice Recorder and it sounded equally messed up.
After some fiddling, I figured out the Zoom was sending out a 48Khz stream but Windows was set to receive a 44.1Khz stream. Here’s how you can fix it in Windows 1909.
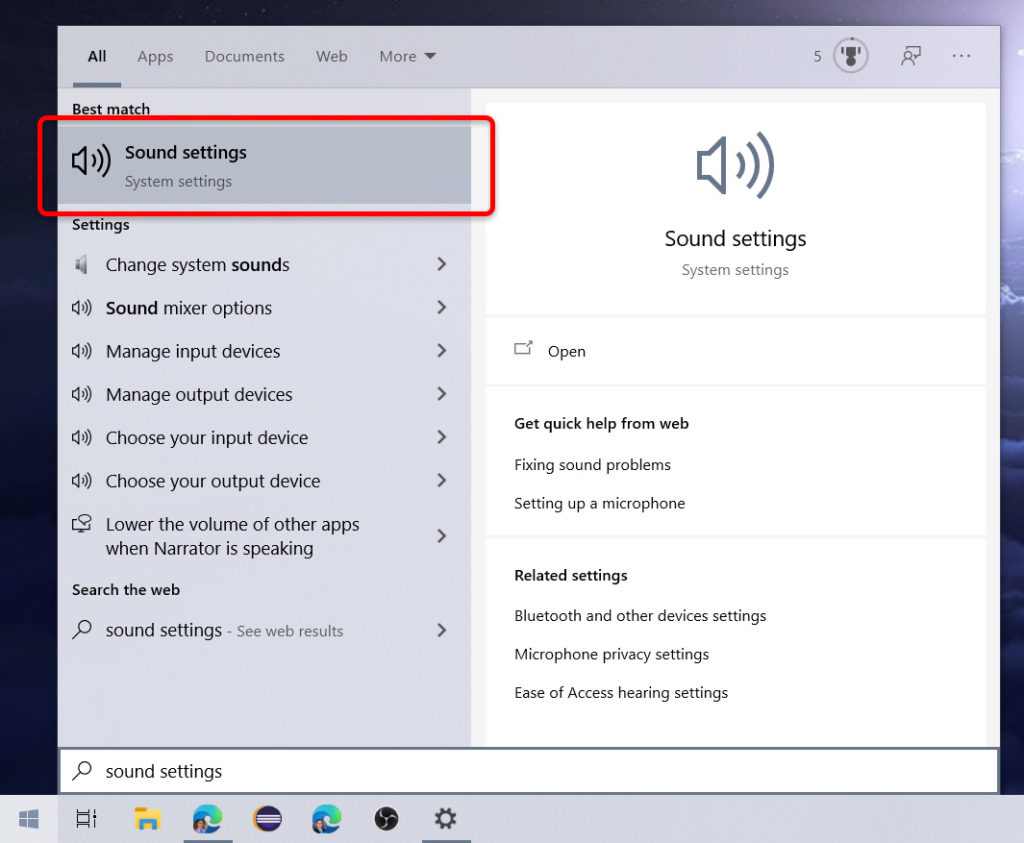
Step 1: Click the Windows button in the bottom left corner and type sound settings. Click the Sound settings option.
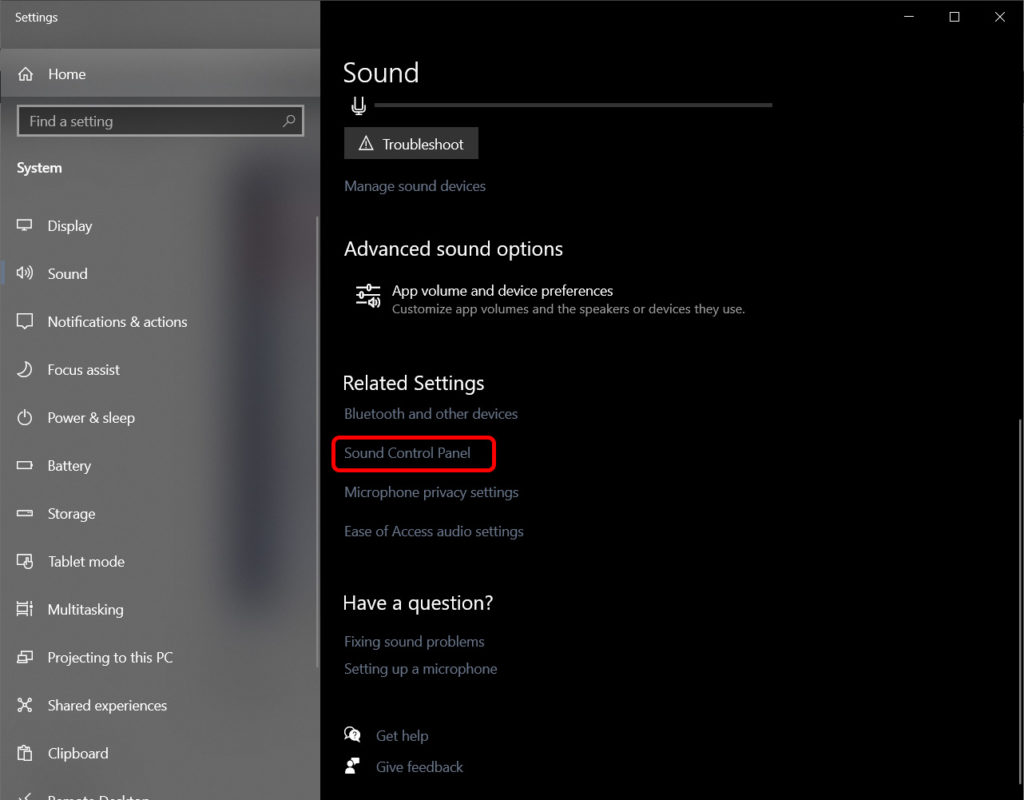
Step 2: Scroll down in the Sound panel and click Sound Control Panel. This will bring up the old-school Windows sound control panel (that is far superior to the Windows 10 panel, but I digress…)
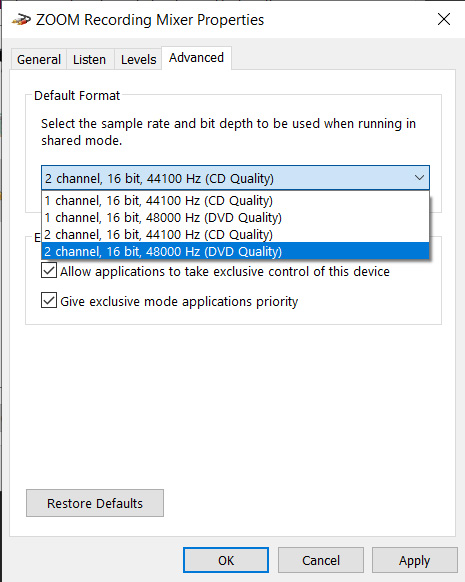
Step 3: In the Sound panel, choose the Recording tab, then click on the ZOOM Recording Mixer H5 device, then click the Properties button.
Step 4: In the ZOOM Recording Mixer Properties dialog box, Click the Advanced tab, click the Default Format dropdown box, and choose the 2 channel, 16-bit, 48000 Hz (DVD quality) option, then click OK.
That’s it. Once you make this change, your sound recordings will sound as good as your mic will allow. Note that it may have been possible to change the Zoom so that it was sending a 44.1Khz signal, but I would rather have the maximum quality the device can put out as long as my PC can handle it.
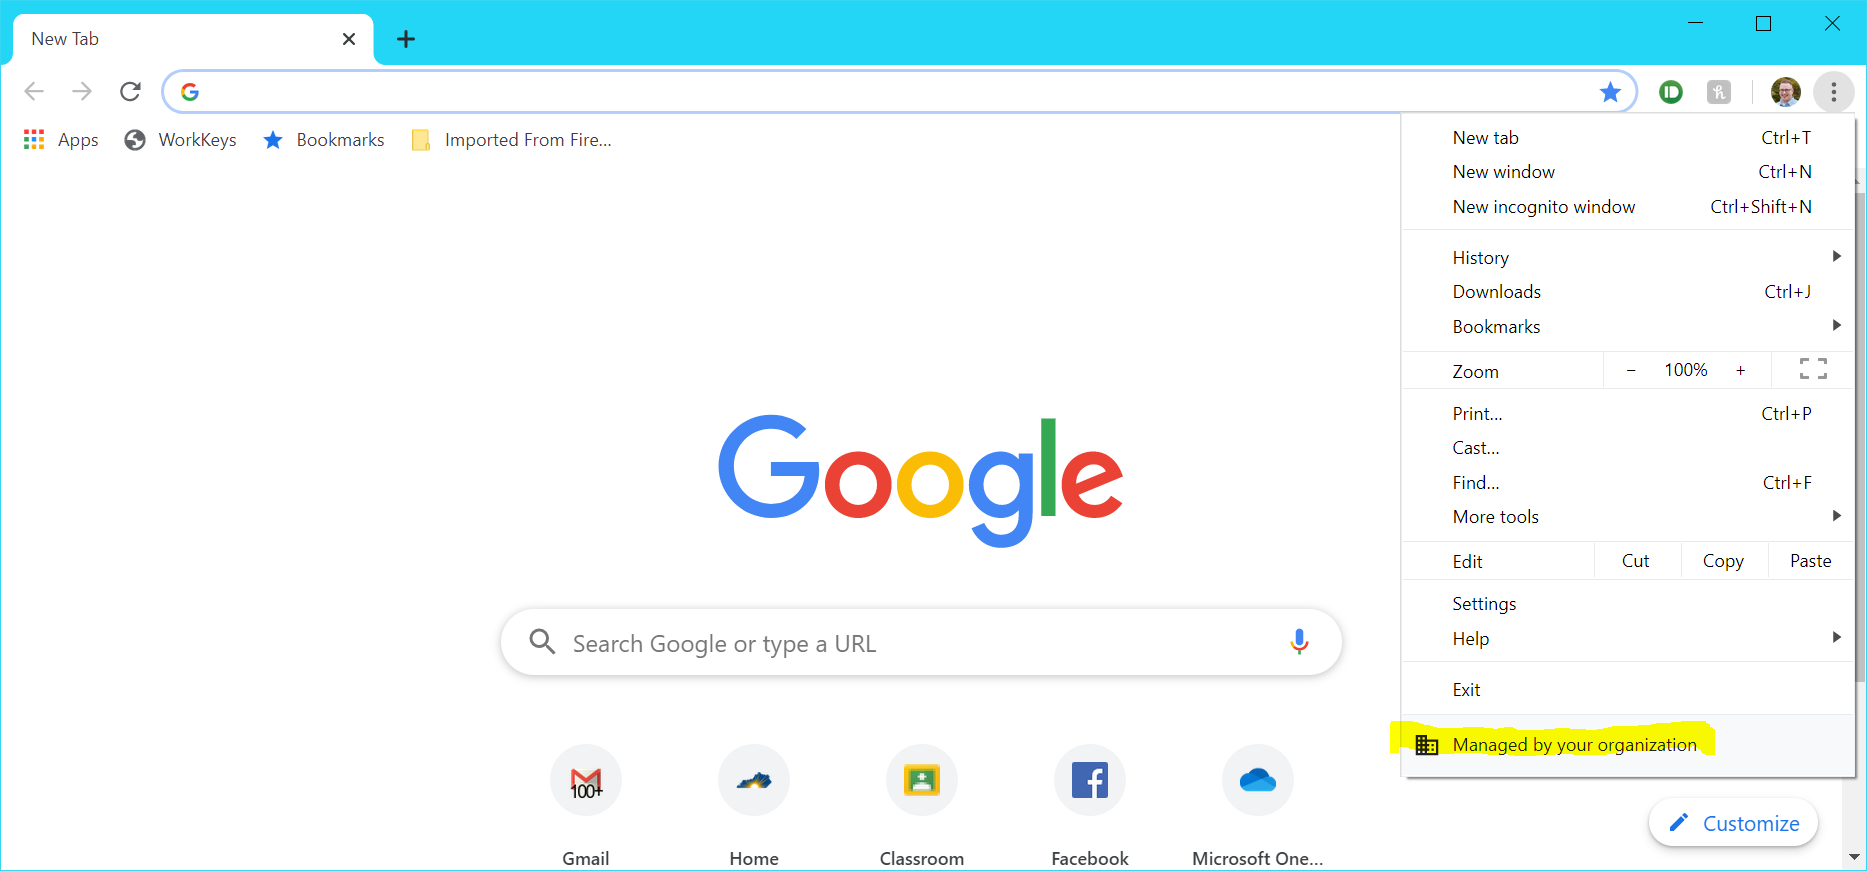
A few minutes ago, I decided to see if I could cast Chrome to a TV. When I clicked the Chrome menu button, I spied something I hadn’t seen before at the bottom of the menu: “Managed by your organization.”
My Chrome browser suddenly said “Managed by your organization”…Except, it shouldn’t have been
The thing is, this laptop has never been managed by an organization, nor is my Google account. Both are, and have always been, mine to do with as I please. And if there’s one thing I don’t like is for my my technology to start telling me I’m not the boss. 😡
So, I started searching around to see what may be the cause of this. After scouring several forums and tech press posts about this, I was able to piece together why Chrome was saying this, and more importantly, how to make it stop sayng my browser was managed by someone other than me.
Why Did My Chrome Start Saying This? If any of the available policies are set for your Chrome browser, it will show the “Managed by an organization” message. Apparently, up until a certain version (I read conflicting reports of the exact version that started it), only certain policies would trigger the warning. Now, however, any set policies will cause it to show up.
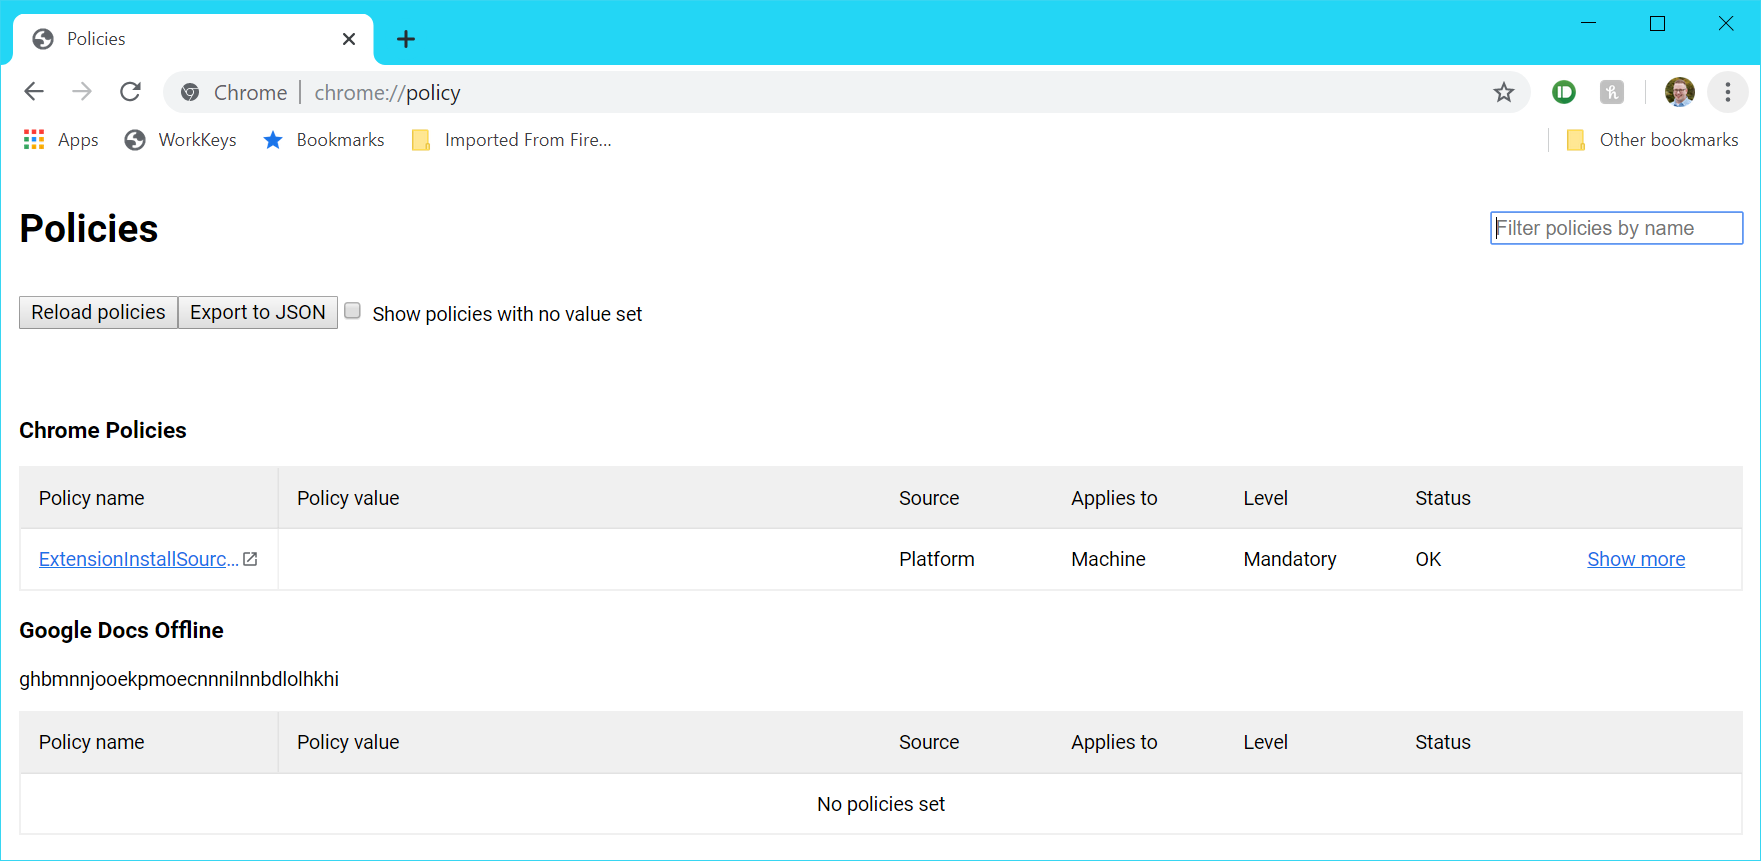
How Can I Check What Policies I Have Enabled? I learned there’s a handy Chrome URL that will show you all managed policies that are enabled. If you type chrome://policy into your address bar, it will show you all the policies applied and what the value of each policy is.
Type chrome://policy into your address bar to see all enabled policies
What Policies Did I Have Enabled? I only had one policy enabled: ExtensionInstallSources and it had no value set. According to some of the stuff I read, malware can set policies to allow malicious extensions to be installed, but ExtensionInstallSources is not one of the bad ones (or so one poster said). And since there was no value set, this policy had zero effect. So I left it at that and didn’t try to remove it, right? OF COURSE NOT.
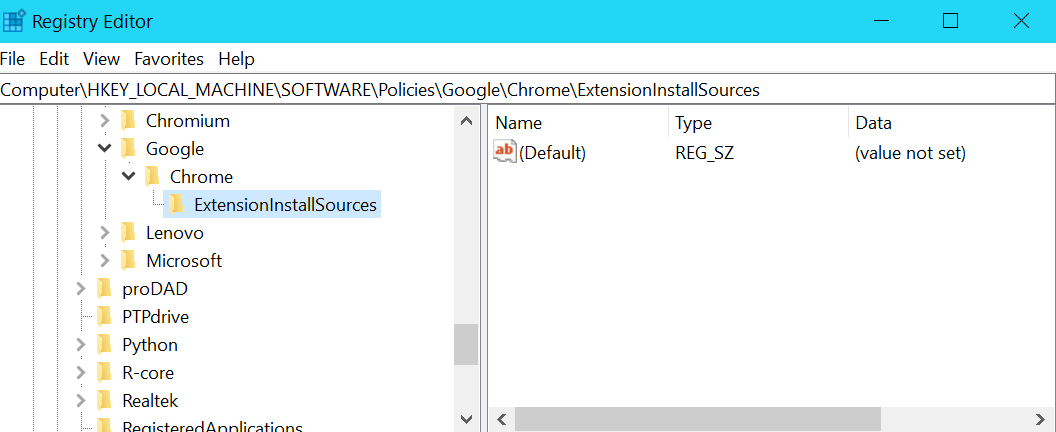
How’d I Get Rid of the ExtensionInstallSources Policy? You would think there’d be a delete option within the chrome://policy page since I am the one who installed Chrome on this machine, but alas, there isn’t. Luckily, I figured out where the Windows registry key was to banish this foul beast (er…the menu item I don’t want to see anymore).
There will be one key in here for each policy enabled. As you can see in my case, the only subkey I had was ExtensionInstallSources and it was empty with no values.
The Windows registry key HKEY_LOCAL_MACHINE\SOFTWARE\Policies\Google\Chrome\ will show you all the enabled policies.
I right clicked the ExtensionInstallSources subkey and deleted it. When I restarted Chrome…HURRAY! The “Managed by your organization” message was gone! I will now be able to sleep peacefully tonight.
I’m assuming you can delete any Chrome policy using this method, but this is the only one I’ve actually tested out. Good luck!
Bec got me an IBM 5150 PC for Christmas! In this video, I swap out the MDA video adapter for a VGA adapter and test it out.
Here’s some details discussed/discovered in the video:
Video Card
Since I don’t have an MDA monitor, I install an 8-bit Western Digital PVGA1A-JK based video card. (Thanks to user KD5VMF for his/her knowledge of the video card dip switches posted here on the Vintage Computer Forum: http://www.vcfed.org/forum/archive/in…) Also of note and not shown in the video is that I had to set SW1 switches 5 and 6 to “On” in order for the VGA card to work.
CPU
I also discover the computer has an NEC D8088D CPU installed instead of the stock Intel CPU. This is odd because the two are functionally identical. The original CPU may have went bad but I guess we’ll never know.
IBM DOS and the 5.25″ Floppy Drives
I boot the machine with IBM DOS 3.21 and IBM DOS 3.3. The IBM-branded “A:” drive works. The “B:” drive does not. An attempted repair video will be forthcoming.
Just in case anyone needs it, here is a driver floppy disk image for the Network Anywhere 10/100 PCI Ethernet Adapter. The original floppy I made this from came with a card I bought on a sweltering July night in 2003 at my local Wal-Mart to satisfy some crazed nerd project I was working on.
You will need 7-Zip to extract the image and something like WinImage to write it to disk.
There’s a scary threat sweeping the computing world known as ransomware. Ransomware is a type of harmful software that makes your data unreadable unless you pay the creator money to make it readable again. And, unlike the threats of yesteryear (i.e. viruses, Trojans, rootkits, etc.), it is extremely unlikely that any antivirus software can help you recover your data because it is encrypted in such a way that even a supercomputer can’t easily descramble it. Even worse, most users don’t do anything wrong to get infected. Clever hackers have figured out how to infect machines by infecting perfectly reputable websites with malware that installs the ransomware just from visiting.
When users are infected with ransomware, they are normally greeted with a sort of virtual ransom note that explains how much it will cost to get their data back, how long they have to pay up, and where to send the money. If you don’t pay, the bad guys delete the key and your data is lost forever because the key is nearly impossible to guess. If you’re wondering why law enforcement can’t just trace the accounts where the ransom money gets deposited, it’s because payment must be made in Bitcoin, which is an odd currency born on the Internet that gets traded and exchanged for actual monies on some of the darkest corners of the Internet. This ensures there is no paper trail to follow. Most ransomware makers will decrypt your files if you pay as instructed, but there’s absolutely no guarantee your infector will follow through.
The only thing you can do to protect yourself is back up your important files often onto something that can’t be changed by ransomware if it finds its way onto your computer. Flash drives are great because you can make the backup and disconnect it from the machine. Even better is the old-school method of burning your important files to a CD or DVD because the ransomware can’t change the data because optical discs are read-only once burned. Hopefully, the antivirus makers will figure out how to neutralize ransomware, but for now, backup often or literally pay for it later.
Let’s say you forget your LimeSurvey admin password and, very importantly, the server it’s running on cannot send email. Since the normal method for resetting a forgotten password involves email you will need to update the password via the underlying MySQL database.The password is stored as a SHA256 hash, so you need to use the MySQL function SH2() to complete the update. The actual query looks like this:
UPDATE `tblpr_users`

   SET PASSWORD = sha2('newPassword*',256)

   WHERE uid = 1
Keep in mind that the table name (in this case tblpr_users) should be adjusted to whatever your table prefix is. Also, the password string (the first parameter in the SHA2 function) needs to be changed to whatever your password is.
The short answer that fixed the electrical noise problem: Plug a powered USB hub into a USB port on your machine. Then plug the Audiobox USB into that. From what I can tell, if your USB port isn’t putting out enough power, you will get hissing and/or electrical wave noise. (I used a cheap, powered USB power squid hub I’ve had forever.)
The long answer with details: Back in April, I bought a PreSonus AudioBox USB 2×2 audio interface so I could use a Shure SM-58 microphone to record instructional videos. I’ve tried many other mics, including a Blue Yeti USB, and while several sounded good, I could never get the level of noise rejection that I wanted. My mouse and keyboard clicks were always too loud and I have a noisy heat pump. No matter what I did with gain, levels, and pop filters, there was always too much unwanted background noise. The SM-58 has excellent noise rejection and had a nice rich sound for spoken-word content like I would be producing.
I got the unit home and setup the latest driver from PreSonus prior to plugging the unit in as instructed. I plugged up the unit and it installed fine. I opened Audacity and recorded several test tracks to get my levels set properly. The problem was when I set my levels in the butter zone between too quiet and clipping, there was always some form of electrical noise. Sometimes, it was a hiss, sometimes it was a sine wave pattern, sometimes it was a “click click click.” It was totally unacceptable. Here’s all the stuff I tried that DID NOT work:
I unplugged and plugged back in the unit in the same USB port.
I unplugged and plugged back in different USB ports, including ones integrated on my motherboard and others on a Silverstone PCI-E USB 3.0 card hooked to the machine. No difference.
I rebooted many times in different configurations.
I made sure all peripherals plugged into my machine were on the same AC circuit (to make sure it wasn’t a ground-loop problem).
I bought a new gold-plated, shielded USB cable from Monoprice. This helped actually helped a little, but not enough.
I rerouted every cable going into my machine such that the Audiobox USB cable had no other cables within 6″ of it. Additionally, I made sure the monitor headphones and mic cables were straight and not crossing one another in any way.
I was fed up and tempted to order a more expensive unit from a different company. In a last ditch effort, I plugged in a cheap USB powered power squid hub into one of the integrated USB ports on my motherboard, then plugged the Audiobox One into that. To my sheer amazement and delight, that worked like a charm! Even with the gain all the way up on my mic channel, no noise whatsoever. And playback through the unit into the monitor headphones is crisp and clear. None of the aforementioned electrical noise! My only guess is that the unit doesn’t do well if there isn’t enough power coming from the USB port. Instead of not working at all, it makes due and produces a terrible signal.
I didn’t try a powered USB hub sooner because back in the day, the conventional wisdom was that any USB audio gear should be plugged directly into the motherboard. It’s 2015, so I guess that isn’t always the case anymore. For what it’s worth, I’m not going to plug anything else into the powered hub for fear that it may mess up the sweet perfection of my current audio signal!
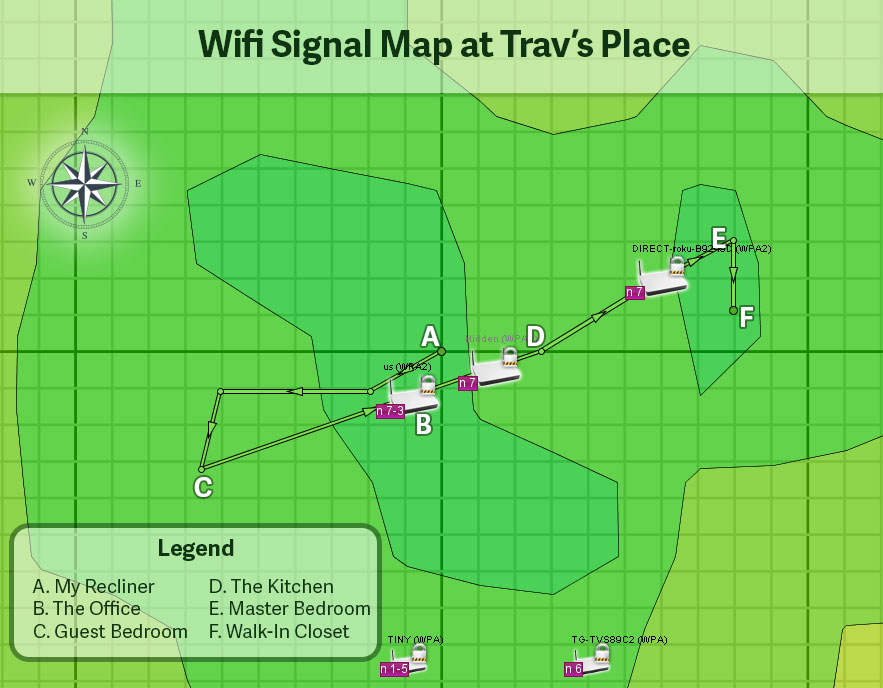
Today I used the free Ekahau HeatMapper on Windows to map out the wifi signal strengths here at the house. I took the resulting map into Photoshop and made, what I consider, a fairly nice map. (Note that it is not perfectly to scale, because I don’t have an actual floor plan to use as the map.)
Here’s the wifi signal map taken at my house on June 26, 2015.
HeatMapper seems pretty accurate since the indicated wifi signal strengths match what my devices usually tell me. The program could definitely help to troubleshoot slow wifi in a crowded neighborhood as it provides channel information for all detected hotspots. I have no crowding here: There are only two other routers I can see and the signal is so low they couldn’t interfere with a gnat.
What I Did When HeatMapper Found No Signals
One thing I ran into before being able to complete this fun-waste-of-an-afternoon project is that your wifi chipset has to support monitor mode (or promiscuous mode, as it was called back in the day :). If a chipset doesn’t support it, HeatMapper just sits there waiting for signals and nothing shows up. Not surprisingly, the Intel Centrino Wireless-N 2230 chipset in my laptop doesn’t support monitor mode. I remembered that I bought a Netgear N300 Wi-Fi USB Adapter last year to help with a project I worked on (which had been buried in the back of the Jeep, long-forgotten). I plugged it in an HeatMapper immediately started picking up signals.
(Special thanks to Patrick Norton of TekThing for introducing me to HeatMapper! I’m super excited to see him still on the air. You should support his show at https://www.patreon.com/TekThing)