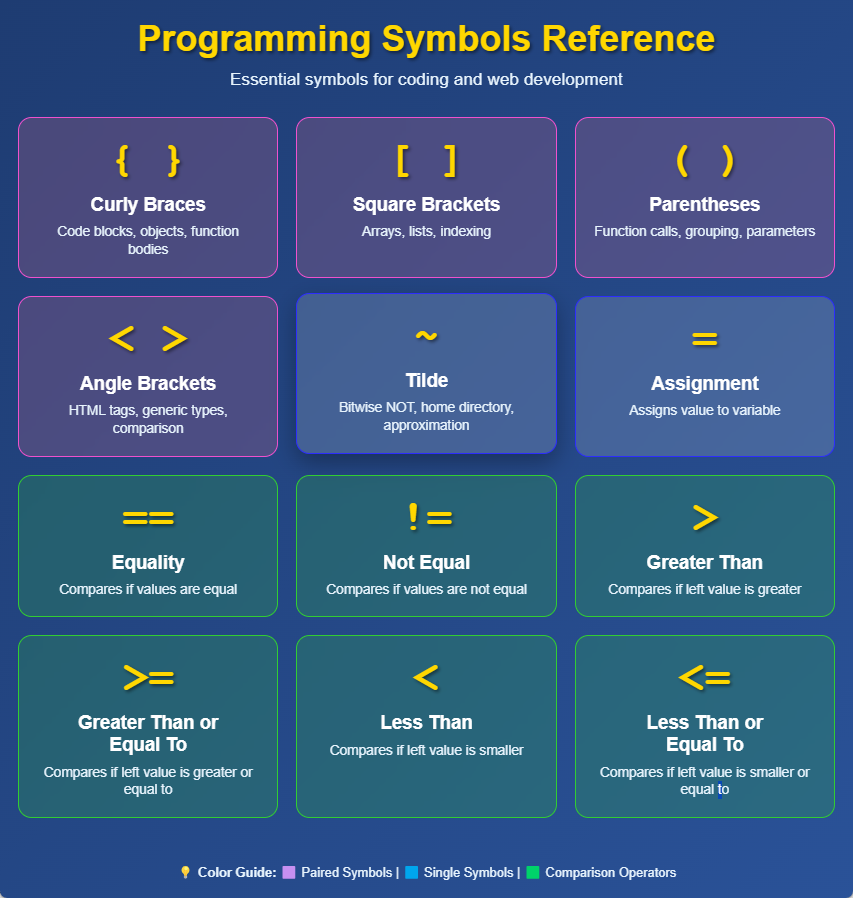
Windows 10 Lockscreen Picture Saver

TLDR Version: Download the program below to make it easy to save Windows 10 Lockscreen Images. Extract the file and run the .exe with the blue icon. Double-click on any lockscreen wallpaper you wish to save. Point to the folder where you want to save it and give it a filename. Click “Save.” Enjoy your saved lockscreen wallpapers!

Please Note: I have tested this program on my own computer and it seems to work well. I don’t expect it will cause you any problems. HOWEVER, I am not responsible for any damage it may cause! Use this program at your own risk.

Detailed Description: If you have a Windows 10 computer, you may notice that Microsoft puts some absolutely beautiful pictures on your lockscreen (the thing you see before you get logged into your machine). Unfortunately, Microsoft doesn’t make it very easy to save these images so you can use them later on your desktop, put them back on the lock screen, or whatever else you want to do with them.

I sat down this evening and wrote a little program in C# that lets you see all the lockscreen images that have been downloaded to your computer. If you see one you want to keep, you simply double click on its thumbnail and you get the option to save it wherever you like. The files come from Microsoft as a jpg, so my program saves them that way as well.

You can download this zip file and extract it. Run the .exe in the resulting folder (it’s the file with the little blue icon) and you’ll see all the images in the folder that contains the downloaded lockscreen wallpapers.

Please Note: I have tested this program on my own computer and it seems to work well. I don’t expect it will cause you any problems. HOWEVER, I am not responsible for any damage it may cause! Use this program at your own risk.

What to Do If a Zoom H5 Audio Interface Sounds Distorted Like a Robot in Windows 10

A couple days ago, I needed to record a short tutorial video for a client. I wasn’t able to get to my normal workstation where I normally do my recordings, so I decided to do it using my laptop running Windows 10 1909 and my Zoom H5 recorder with a Sennheiser ME-2 II lavalier mic plugged into it.

I plugged into a USB 3 port and chose the Audio Interface option. Then I installed the AISO stereo driver and rebooted the computer. I made my recording the PCs desktop using OBS where I had set the H5 up as an audio source. When I played back the recording, I sounded like a robot, or better yet, one of those people on a show about gangs who doesn’t want to be identified and they have their voice distorted where it’s really low pitched and garbled.

Just to verify it wasn’t an OBS issue, I tried a recording in the Windows 10 Voice Recorder and it sounded equally messed up.

After some fiddling, I figured out the Zoom was sending out a 48Khz stream but Windows was set to receive a 44.1Khz stream. Here’s how you can fix it in Windows 1909.

Step 1: Click the Windows button in the bottom left corner and type sound settings. Click the Sound settings option.

Step 2: Scroll down in the Sound panel and click Sound Control Panel. This will bring up the old-school Windows sound control panel (that is far superior to the Windows 10 panel, but I digress…)

Step 3: In the Sound panel, choose the Recording tab, then click on the ZOOM Recording Mixer H5 device, then click the Properties button.

Step 4: In the ZOOM Recording Mixer Properties dialog box, Click the Advanced tab, click the Default Format dropdown box, and choose the 2 channel, 16-bit, 48000 Hz (DVD quality) option, then click OK.

That’s it. Once you make this change, your sound recordings will sound as good as your mic will allow. Note that it may have been possible to change the Zoom so that it was sending a 44.1Khz signal, but I would rather have the maximum quality the device can put out as long as my PC can handle it.

Why Did Chrome on My Personal Laptop say “Managed by your organization”

A few minutes ago, I decided to see if I could cast Chrome to a TV. When I clicked the Chrome menu button, I spied something I hadn’t seen before at the bottom of the menu: “Managed by your organization.”

My Chrome browser suddenly said "Managed by your organization"...Except, it shouldn't have been

My Chrome browser suddenly said “Managed by your organization”…Except, it shouldn’t have been

The thing is, this laptop has never been managed by an organization, nor is my Google account. Both are, and have always been, mine to do with as I please. And if there’s one thing I don’t like is for my my technology to start telling me I’m not the boss. 😡

So, I started searching around to see what may be the cause of this. After scouring several forums and tech press posts about this, I was able to piece together why Chrome was saying this, and more importantly, how to make it stop sayng my browser was managed by someone other than me.

Why Did My Chrome Start Saying This? If any of the available policies are set for your Chrome browser, it will show the “Managed by an organization” message. Apparently, up until a certain version (I read conflicting reports of the exact version that started it), only certain policies would trigger the warning. Now, however, any set policies will cause it to show up.

How Can I Check What Policies I Have Enabled? I learned there’s a handy Chrome URL that will show you all managed policies that are enabled. If you type chrome://policy into your address bar, it will show you all the policies applied and what the value of each policy is.

Type chrome://policy into your address bar to see all enabled policies

Type chrome://policy into your address bar to see all enabled policies

What Policies Did I Have Enabled? I only had one policy enabled: ExtensionInstallSources and it had no value set. According to some of the stuff I read, malware can set policies to allow malicious extensions to be installed, but ExtensionInstallSources is not one of the bad ones (or so one poster said). And since there was no value set, this policy had zero effect. So I left it at that and didn’t try to remove it, right? OF COURSE NOT.

How’d I Get Rid of the ExtensionInstallSources Policy? You would think there’d be a delete option within the chrome://policy page since I am the one who installed Chrome on this machine, but alas, there isn’t. Luckily, I figured out where the Windows registry key was to banish this foul beast (er…the menu item I don’t want to see anymore).

Launch regedit and navigate to the key:

HKEY_LOCAL_MACHINE\SOFTWARE\Policies\Google\Chrome\

There will be one key in here for each policy enabled. As you can see in my case, the only subkey I had was ExtensionInstallSources and it was empty with no values.

The Windows registry key HKEY_LOCAL_MACHINE\SOFTWARE\Policies\Google\Chrome\ will show you all the enabled policies.

The Windows registry key HKEY_LOCAL_MACHINE\SOFTWARE\Policies\Google\Chrome\ will show you all the enabled policies.

I right clicked the ExtensionInstallSources subkey and deleted it. When I restarted Chrome…HURRAY! The “Managed by your organization” message was gone! I will now be able to sleep peacefully tonight.

I’m assuming you can delete any Chrome policy using this method, but this is the only one I’ve actually tested out. Good luck!

Fantastic New Local Pizza

My good friend Kelly Clibern has started Kel’s Patriot Pizza in Campton, KY. It really is fantastic pizza. He’s using some sort of sauce that has a very unique flavor. On top of the food being great, I really like that it’s a family-owned business being run by his wife, kids, and himself. Having your own business is one of the original American Dreams, and I’m happy that Kel and his crew are chasing it with all they have!