-
How to Fix PreSonus Audiobox USB Electrical Noise (Hissing, Popping, and Clicking) Problem
The short answer that fixed the electrical noise problem: Plug a powered USB hub into a USB port on your machine. Then plug the Audiobox USB into that. From what I can tell, if your USB port isn’t putting out enough power, you will get hissing and/or electrical wave noise. (I used a cheap, powered USB power squid hub I’ve had forever.)
The long answer with details: Back in April, I bought a PreSonus AudioBox USB 2×2 audio interface so I could use a Shure SM-58 microphone to record instructional videos. I’ve tried many other mics, including a Blue Yeti USB, and while several sounded good, I could never get the level of noise rejection that I wanted. My mouse and keyboard clicks were always too loud and I have a noisy heat pump. No matter what I did with gain, levels, and pop filters, there was always too much unwanted background noise. The SM-58 has excellent noise rejection and had a nice rich sound for spoken-word content like I would be producing.
I got the unit home and setup the latest driver from PreSonus prior to plugging the unit in as instructed. I plugged up the unit and it installed fine. I opened Audacity and recorded several test tracks to get my levels set properly. The problem was when I set my levels in the butter zone between too quiet and clipping, there was always some form of electrical noise. Sometimes, it was a hiss, sometimes it was a sine wave pattern, sometimes it was a “click click click.” It was totally unacceptable. Here’s all the stuff I tried that DID NOT work:
- I unplugged and plugged back in the unit in the same USB port.
- I unplugged and plugged back in different USB ports, including ones integrated on my motherboard and others on a Silverstone PCI-E USB 3.0 card hooked to the machine. No difference.
- I rebooted many times in different configurations.
- I made sure all peripherals plugged into my machine were on the same AC circuit (to make sure it wasn’t a ground-loop problem).
- I bought a new gold-plated, shielded USB cable from Monoprice. This helped actually helped a little, but not enough.
- I rerouted every cable going into my machine such that the Audiobox USB cable had no other cables within 6″ of it. Additionally, I made sure the monitor headphones and mic cables were straight and not crossing one another in any way.
I was fed up and tempted to order a more expensive unit from a different company. In a last ditch effort, I plugged in a cheap USB powered power squid hub into one of the integrated USB ports on my motherboard, then plugged the Audiobox One into that. To my sheer amazement and delight, that worked like a charm! Even with the gain all the way up on my mic channel, no noise whatsoever. And playback through the unit into the monitor headphones is crisp and clear. None of the aforementioned electrical noise! My only guess is that the unit doesn’t do well if there isn’t enough power coming from the USB port. Instead of not working at all, it makes due and produces a terrible signal.
I didn’t try a powered USB hub sooner because back in the day, the conventional wisdom was that any USB audio gear should be plugged directly into the motherboard. It’s 2015, so I guess that isn’t always the case anymore. For what it’s worth, I’m not going to plug anything else into the powered hub for fear that it may mess up the sweet perfection of my current audio signal!
-
Introducing Jerry.Education
I have created a new domain, jerry.education, as a place to aggregate all of my educational resources. I feel it will help more people find my digital literacy resources than just hosting them here, as the URL itself is rather self-descriptive. I am going to leave the Desktop Publishing Projects page here for legacy purposes, but going forward, new stuff will be posted on jerry.education.
-
Wifi Signal Map at My Place
Today I used the free Ekahau HeatMapper on Windows to map out the wifi signal strengths here at the house. I took the resulting map into Photoshop and made, what I consider, a fairly nice map. (Note that it is not perfectly to scale, because I don’t have an actual floor plan to use as the map.)
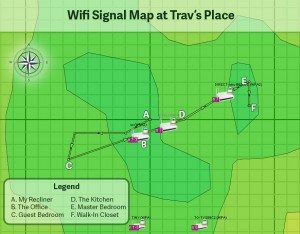
Here’s the wifi signal map taken at my house on June 26, 2015. HeatMapper seems pretty accurate since the indicated wifi signal strengths match what my devices usually tell me. The program could definitely help to troubleshoot slow wifi in a crowded neighborhood as it provides channel information for all detected hotspots. I have no crowding here: There are only two other routers I can see and the signal is so low they couldn’t interfere with a gnat.
What I Did When HeatMapper Found No Signals
One thing I ran into before being able to complete this fun-waste-of-an-afternoon project is that your wifi chipset has to support monitor mode (or promiscuous mode, as it was called back in the day :). If a chipset doesn’t support it, HeatMapper just sits there waiting for signals and nothing shows up. Not surprisingly, the Intel Centrino Wireless-N 2230 chipset in my laptop doesn’t support monitor mode. I remembered that I bought a Netgear N300 Wi-Fi USB Adapter
last year to help with a project I worked on (which had been buried in the back of the Jeep, long-forgotten). I plugged it in an HeatMapper immediately started picking up signals.
(Special thanks to Patrick Norton of TekThing for introducing me to HeatMapper! I’m super excited to see him still on the air. You should support his show at https://www.patreon.com/TekThing)
-
Dual-boot Windows Technical Preview (aka Windows 10) on a UEFI-Enable Computer
I’m really excited about the Windows Technical Preview (aka Windows 10) that was released today. I decided to forgo a virtual machine and dual-boot it on my laptop running Windows 8.1. My laptop is an Asus G55VW and the existing Windows 8.1 installation being setup in UEFI (with the requisite GPT partition scheme).
I downloaded the image and made a flash drive using the Windows 7 USB Download Tool, but when I booted from the drive and tried to install, I got an error message: “Windows cannot be installed to this disk. The selected disk is not of the GPT partition style” when I clicked on the empty partition I wanted to install to.
I realized the flash drive was booting the MBR installer, but I needed UEFI. I realized I needed a USB flash drive setup to boot the Windows Technical Preview installer in UEFI mode. Here’s what I had to do to create the bootable flash drive that does just that:
- Plug a flash drive into a USB port on your machine.
- Download the Windows Technical Preview 64 bit ISO at http://preview.windows.com (you’ll have to join the free Windows Insider program and click through a few screens to get to the download link)
- Download Rufus. Rufus is a small utility that will put the ISO files on a flash drive you can use to boot from and install Windows. While there are other utilities that do this, Rufus allows you to specifically setup the flash drive as a GPT boot device. This will allow you to install Windows Technical Preview on a GPT drive, side-by-side with Windows 7/8/8.1.
- Launch Rufus.
- Set the Device dropdown to the flash drive you want to turn into a technical preview installer.
- Set the Partition scheme and target system type dropdown to GPT partition scheme for UEFI computer.
- Click the little disc icon next to the ISO image drop down and point to the Technical Preview ISO you downloaded in step 1.
- Click Start and wait until the status says DONE.
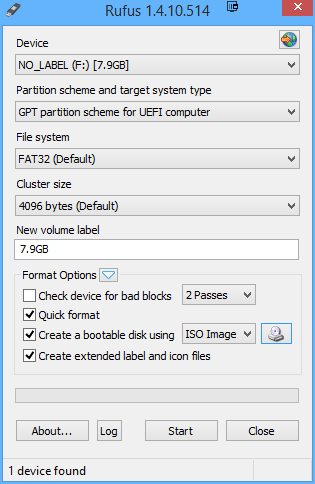
Setup Rufus as shown, using the Windows Technical Preview ISO as the source image You should now be able to boot from the USB drive and install the 64 bit Technical Preview in dual boot on most machines that boot using UEFI and have a hard disk with GPT. I’ll leave it to you to find out how to create a empty partition to use for the installation, but at least now you will have a UEFI flash drive installer.
Categories
- Adobe (1)
- Illustrator (1)
- Android (6)
- Apple (4)
- iPhone (1)
- Cell Phone Tricks (1)
- DSLR/Camera (1)
- Gadgets (3)
- Games (1)
- Google (2)
- Helpful Stuff for Teachers (1)
- Intro to Computer Programming (1)
- Kindle Fire (5)
- Linux (3)
- Microsoft Office (1)
- Excel (1)
- Microsoft Windows (33)
- Windows 10 (5)
- Windows 11 (8)
- Windows 8 (2)
- Windows Technical Preview (1)
- Mike Bryant for State Representative (5)
- OS X (7)
- Personal Failure (1)
- Personal Updates (241)
- Physical Fitness Challenge (2)
- Political Commentary (6)
- Raspberry Pi (1)
- RaspBMC (1)
- Recommended Products and Vendors (4)
- Social Commentary (5)
- Sustainability in Eastern Kentucky (2)
- Tech Tips (73)
- Getting Nerdy (1)
- Windows 10 (3)
- Windows 11 (6)
- Web Development/Programming (14)
- Visual Basic (1)
Archives