Microsoft Windows

Microsoft Windows, Tech Tips, Windows 10, Windows Technical Preview

Dual-boot Windows Technical Preview (aka Windows 10) on a UEFI-Enable Computer

I’m really excited about the Windows Technical Preview (aka Windows 10) that was released today. I decided to forgo a virtual machine and dual-boot it on my laptop running Windows 8.1. My laptop is an Asus G55VW and the existing Windows 8.1 installation being setup in UEFI (with the requisite GPT partition scheme).

I downloaded the image and made a flash drive using the Windows 7 USB Download Tool, but when I booted from the drive and tried to install, I got an error message: “Windows cannot be installed to this disk. The selected disk is not of the GPT partition style” when I clicked on the empty partition I wanted to install to.

I realized the flash drive was booting the MBR installer, but I needed UEFI. I realized I needed a USB flash drive setup to boot the Windows Technical Preview installer in UEFI mode. Here’s what I had to do to create the bootable flash drive that does just that:

  1. Plug a flash drive into a USB port on your machine.
  2. Download the Windows Technical Preview 64 bit ISO at http://preview.windows.com (you’ll have to join the free Windows Insider program and click through a few screens to get to the download link)
  3. Download Rufus. Rufus is a small utility that will put the ISO files on a flash drive you can use to boot from and install Windows. While there are other utilities that do this, Rufus allows you to specifically setup the flash drive as a GPT boot device. This will allow you to install Windows Technical Preview on a GPT drive, side-by-side with Windows 7/8/8.1.
  4. Launch Rufus.
    1. Set the Device dropdown to the flash drive you want to turn into a technical preview installer.
    2. Set the Partition scheme and target system type dropdown to GPT partition scheme for UEFI computer.
    3. Click the little disc icon next to the ISO image drop down and point to the Technical Preview ISO you downloaded in step 1.
    4. Click Start and wait until the status says DONE.
Setup Rufus as shown
Setup Rufus as shown, using the Windows Technical Preview ISO as the source image

You should now be able to boot from the USB drive and install the 64 bit Technical Preview in dual boot on most machines that boot using UEFI and have a hard disk with GPT. I’ll leave it to you to find out how to create a empty partition to use for the installation, but at least now you will have a UEFI flash drive installer.
Microsoft Windows

A Fix for Windows Installer Error 3728

If you ever get a Windows Installer Error Code 3728, I found a really easy fix that might work for you. ( I say might because I’ve had many problems with MSI installers over the years and it has normally been a lot of trial-and-error to fix them.) As with any fix I post, follow these steps at your own risk. There’s no way I can know every single configuration out there and your mileage may vary.

  1. Click Start, type regedit.exe, and press enter (Give the ok for Administrator privileges if you have UAC enabled).
  2. Right-click on the HKEY_CURRENT_USER hive and choose Find…
  3. Type (or copy and paste) this key into the find box: {B54F3741-5B07-11cf-A4B0-00AA004A55E8}
  4. If this key is found anywhere in the HKEY_CURRENT_USER hive, right-click and Delete it. Very, very important: Do not delete this key from any hive other than HKEY_CURRENT_USER. Doing so may seriously mess up your system.
  5. Re-run whatever you were trying to install that was failing. If the install goes through, you’re good to go. If not, keep Googling because that’s all the medicine I’ve got for Error Code 3728 :)

As far as why this error occurs, it has something to do with the TrustedInstaller account permissions. The various sources I read to help me fix this issue had a lot of conflicting information and I managed to piece this fix together from bits and pieces of a few of them. I hope this helps!


Microsoft Windows, Tech Tips

Get Rid of Text Formatting (in Almost Any Program)

Have you ever copied some text from a webpage (or any formatted program, for that matter) and pasted it into another program only to find that all the fancy formatting simply doesn’t look right in its new location? If I had a nickel for every time that copy and paste between program hasn’t played nice, I’d be a wealthy man…Anyway, I’ve always relied on a trick that most people don’t think about when I want just text and nothing else:

  1. Copy your text from your source (no matter how heavily formatted it may be)
  2. Open Notepad
  3. Paste the text into Notepad
  4. Highlight and copy the text from Notepad
  5. Paste your (unformatted text) into the destination program.

This tip isn’t rocket science, but a lot of people have never thought if it.

Microsoft Windows, Tech Tips, Windows 8

Right click in the bottom left corner of Windows 8 for some awesome options

I really like Windows 8.  I’ve upgraded my desktop and my netbook (which I’m typing this post on) and it has made both machines run faster than Windows 7.  Windows 8’s designers thought of all sorts of little things that I absolutely love.

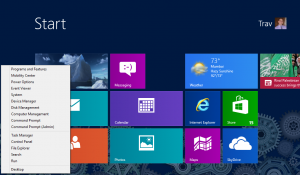
My favorite is right-clicking in the bottom left corner of the screen (no matter what mode you are in). You’ll be greeted with an awesome menu with a bunch of Power User favorites.

Right-click the bottom left corner of a Windows 8 screen to get this sweet menu with loads of Power User favorites.

The menu includes the following shortcuts (with my favorites in bold):

  • Programs and Features
  • Mobility Center
  • Power Options
  • Event Viewer
  • System
  • Device Manager
  • Disk Management
  • Computer Management
  • Command Prompt
  • Command Prompt (Admin)
  • Task Manager
  • Control Panel
  • File Explorer
  • Search
  • Run
  • Desktop

This list is a who’s who of stuff that Power Users, system admins, and lab managers use every single day in one quick-to-access place. If you are one of these people, make sure to add this to your mental toolbox. Happy admin’ing!

Microsoft Windows, Tech Tips, Windows 8

Creating a System Image in Windows 8 Without Using Third-Party Tools

I took the plunge about three weeks ago and upgraded from Windows 7 Home Premium to Windows 8 Pro. (I took advantage of the fantastic $39.99 upgrade deal, which is good until January 31, 2013.) I’m not going to do a full review, but suffice it to say I think Windows 8 is great. It has a learning curve and the Start Screen freaks a lot of people out, but I promise, there’s more to like than dislike once you get used to it. It is definitely faster than Windows 7 and I think it was a step in the right direction.

As always with any major OS upgrade, some stuff gets moved around or changed. I’ve had very little trouble getting used to things, but then I asked myself, “How can I create a System Image in Windows 8 that will allow me to restore EVERYTHING in the event of a hard disk crash?” This should be simple. It was very easy in Windows 7. Why on earth would they ditch it in Windows 8? I found a post about the new Windows 8 File Recovery feature, which looked like a brain-dead version of Windows 7’s backup. Thankfully, though, the Windows 7 Backup tool is included with Windows 8: It’s just hiding. Here’s how to find it:

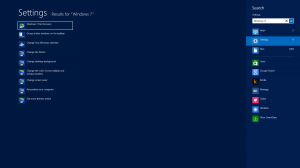
  1. Hit Windows Key+Q to open the Search Charm
  2. Type “Windows 7” in the Search box (without the quotes)
  3. Click “Settings” below the search box.
  4. Now, on the right-hand side of the screen, you should see Windows 7 File Recovery.


Hit Windows Key+Q, type “Windows 7”, click Settings, the click on Windows 7 File Recovery to create a System Image in Windows 8.

From that point, you’ll be able to backup your Library files and create a System Image, exactly like you did in Windows 7. If you’re like me, this probably makes you very happy because I usually prefer to use stuff included in my OS to perform backups. (It’s not that there is anything wrong with third-party tools, but built–in means one less thing I have to hunt down and configure :)

[Very Important: You should NOT put backups from Windows 7 and Windows 8 from the same computer on the same backup drive. The Windows 7 File Recovery tool warns against this, and from what I know about backup sets, this would basically create a very inconsistent state since you would have many (very incompatible) versions of the same files all intermingled. It could make a System Restore a very scary proposition. I’m lucky enough to have plenty of USB hard drives lying around, so I left my Windows 7 System Images on the old backup drive and put the Windows 8 Images on another.]

Microsoft Windows, Tech Tips

Free Utility to Generate MD5 and SHA1 Checksums in Windows XP/Vista/7/8

It turns out that some time ago, Microsoft released a free command line utility called the File Checksum Integrity Verifier for generating MD5 and SHA1 checksums. Best of all, it’s really small (at less than 84 kilobytes) and doesn’t require installation (i.e. can be run from a flash drive).

Microsoft is clear that this is an unsupported utility, but there’s no need for support as it is really easy to use. It will in no way modify your files! To generate MD5 or SHA1 checksums for a file, do the following:

  1. Download the fciv.exe file.
  2. Open a command line by pressing Windows Key and R at the same time, typing cmd, and pressing Enter.
  3. cd into the folder where you downloaded fciv.exe to.
  4. To get an MD5 Checksum for a file, type fciv pathToFileYouWantToCheck (refer to this post for an easy way to copy a file path that can then be pasted here)
  5. To get an SHA1 Checksum for a file, type fciv pathToFileYouWantToCheck -sha1

Happy Checksuming!

Android, Microsoft Windows, Tech Tips

What to do if you can’t update your Android SDK Tools because “folder failed to be renamed or moved”

I got up bright and early this morning to update my Android SDKs (during HughesNet’s all-you-can-eat bandwidth time between 2am-7am). Much to my dismay, the Android Tools wouldn’t update from revision 15 to revision 17 because “a folder failed to be renamed or moved.” I have not had this problem updating in the past, so I was stumped.

The folder that failed to be moved ended up being the tools folder in the Android SDK directory. The problem was that SDK Manager.exe had launched tools\android.bat which uses a whole bunch of files in the tools folder. Of course Android can’t move that folder if the program (and it’s dependencies) doing the updating are in the folder to be moved!

Luckily the solution to this turned out to be really simple:

  1. Go the the android-sdk folder (wherever that may be on your system).
  2. Make a copy of the tools folder (my copy was called tools – Copy).
  3. Open the folder that is a copy (i.e. tools – Copy).
  4. Launch android.bat from that folder.
  5. The updater will launch and update whatever you tell it to.
  6. After the updates are finished, close the updater.
  7. You can then delete the tools – Copy folder and launch the SDK Manager like normal.
  8. Observe that everything updated.

Such a simple solution to a goofy predicament!

Microsoft Windows, Tech Tips

Easy Way to Copy a File Path in Windows Vista and Windows 7

I work with file paths a lot, since I email co-workers locations to stuff on our file servers. And even though I try to avoid it, sometimes it’s absolutely necessary to hard-code a file path into a program or script. In either of these cases, the quicker I can get the path to a file, the better. In the past, I had always used a registry hack or script to add the ability to copy a path from a context menu. Hacking the registry is not a big deal, but wouldn’t it be nice if any Windows computer could have this functionality out of the box?

Little did I know that Windows 7 and Windows Vista have the built-in capability to copy a file path by simply holding shift and right-clicking on the file for which you want the path! In the resulting context menu, the magical phrase Copy Path becomes visible! Clicking it puts the absolute path to the file on the clipboard. It works on both local and remote files.

Apple, Google, Microsoft Windows, OS X, Social Commentary, Web Development/Programming

Let’s not forget Dennis Ritchie

While Steve Jobs’ death has been covered extensively by the media, I think it’s important that the world learn about the death of a man whose contribution to the information age is so immense that it is beyond measure. On October 12, 2011, Dennis Ritchie was found dead in his home at the age of 70. Ritchie is the inventor of the C programming language and a co-inventor of Unix, the father of all modern operating systems. The man was, without a doubt, brilliant. His contributions are what every nerd should aspire to.

Why is the C programming language so important? Because C was the perfect bridge between man and machine. Before C was invented, programmers had to write the code that runs operating systems (and most everything else) in assembly, which is just one step above binary. Assembly, while powerful, is also extremely cumbersome. Writing even the most trivial of programs is very time consuming. Ritchie’s C language put the development cycle of operating systems and applications into overdrive, allowing programmers to crank out innovation quickly and easily. On top of this speed and power, Ritchie gave his newly-minted language away for free to universities, who were free to do with it as they wished. C has since been used on nearly every system imaginable, from super computers, to PCs, to Macs, to video game consoles.

Nearly every programmable device in existence today owes its ability to be useful to Dennis Ritchie. Without his brilliance and willingness to give that brilliance away, we would still be in the dark ages of Information.

Apple, Microsoft Windows, Tech Tips

An easy fix for iTunes 10.5 (x64) that won’t install on Windows 7 64 bit

I just downloaded iTunes 10.5 and tried to install it on my Windows 7 64 bit machine. What I got was an error message that said:

There is a problem with this WIndows Installer package. A program required for this install to complete could not be run. Contact your support personnel or package vendor.

The fix that allowed 10.5 to install correctly was very simple. Simply go to Control Panel > Uninstall a Program. Right-click on “Apple Software Update” and choose “Repair.” After that, iTunes 10.5 (x64) should install with no problems at all. Apparently the Apple Updater can get messed up and cause the new version not to install. Imagine that.

If only all Windows errors were so easy to fix!

Scroll to Top